There has been a lot of information published recently about the Digital Production Partnership, the standardization of file delivery in the UK broadcast chain. Indeed I have alluded to it in previous posts, but what was the motivation for UK broadcasters to gather and come up with the specification?
To ease the problems of inter-company \ inter-department file transfer, and ultimately drive down and cost of entertaining the good people of the UK.
In this blog post I plan to demonstrate how different features in the iCR GUI, the segmentation track and the DPP specific Metadata plug-in, can be used in conjunction to speed up and therefore reduce the cost of delivery to the DPP specification a little more.
In previous blogs I discussed the iCR segment track, how to translate data from UQC analysis and human review of this automatically generated information into an edit list, and the iCR Metadata plug-in for the generation of a side car XML file containing Metadata describing the contents of a file. This blogs aim is to show how they work together:
Step 1:
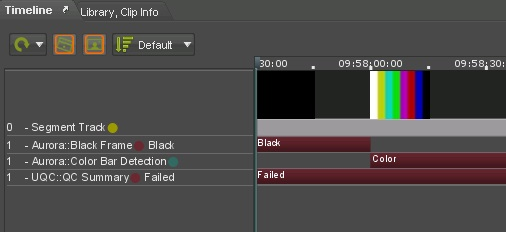
After ingest or transcode to the DPP delivery specification, or if you have been supplied with a file which requires the addition of the DPP Metadata. You can start by dragging the file into the iCR library and initiating a quick scan of the content with a focus on color bars and repeated black frames, the two main start of content identifiers specified by DPP. Upon completion of the QC scan the file can be loaded to the iCR player, the QC data returned from the analysis will be displayed in the iCR timeline.
Step 2:
The user can then scroll across the timeline using the “K” and “L” keys on their keyboard, jumping from QC event to QC event quickly identifying the start and end of each content segment, the mark in and out point of each segment can be set by simply pressing the “I”and “O” keys respectively, the section of content added to the segment track by right clicking on the track and clicking ‘Add From In and Out’.
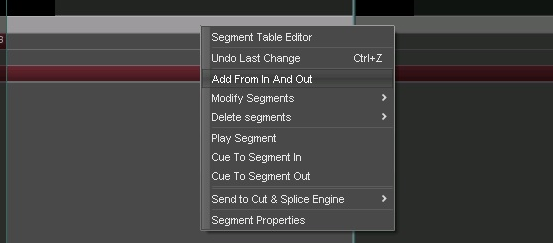
Once all segments have been added to the segments track, opening the Segment Table Editor (see above) allows the rename of each segment to something more meaningful, if required.
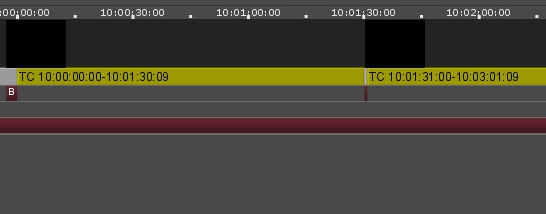
Right click on the Segment track and open the Segment Table Editor, then double click on the Segment name and replace with a name of your liking.
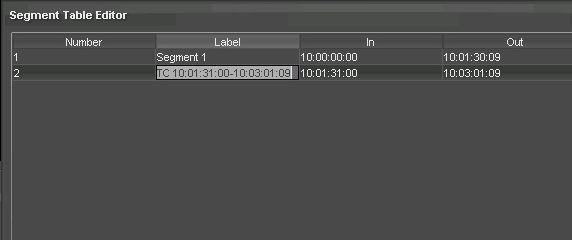
Click OK and confirm the update to the QCML data.
Step 3:
The DPP Plug-in can now be populated. Provided you chose to install the DPP option during the install of iCR, the plug-in will be available as a tab on the right hand side of the GUI. Click on this and the plug-in will appear. Complete the required fields and any optional ones that you have the data for and click ‘Save’. The associated XML file will be generated in the same location as the asset.
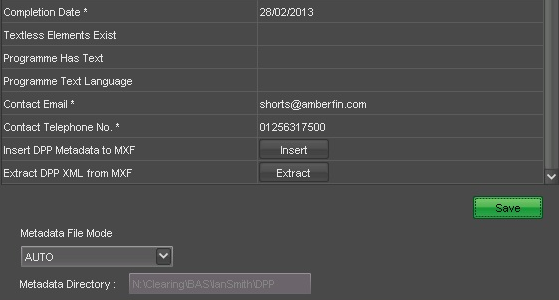
Finally the Metadata and segment information can be written to the MXF wrapper with a click of the ‘Insert’ button, for delivery.
Should you receive a DPP compliant file and require the Metadata XML, this can be extracted from the wrapper and an XML file generated with the click of a button. Then import the file to a library, load into the player and click the ‘Extract’ button. The plug-in will automatically populate and create the XML file in the same location as the essence file.
Featured in: DPP | Metadata | MXF | Transcoding |
With 30 years in the industry, Bruce looks after Media Technology for Dalet. An engineer who designed antennas, ASICs, software, algorithms, systems and standards, Bruce is best known for being @MrMXF and you can get his book on Amazon.
More Articles By Bruce


